Reviews don’t write themselves. Can a review request email campaign be the best way to get reviews for your business?
You may have the best hamburger in town, you might be the lawyer that everyone knows from the commercials, you might run a local SEO agency that ranks number 1 for local in your city. That doesn’t mean you have great reviews.
When prospective customers are checking out your business, what are your reviews saying about you?
Now, you may be uncomfortable with asking your customers for reviews, and that’s fine. But there’s nothing to be ashamed of.
Your happy customers want to support you, but many of them don’t think to write a positive review. Most of them don’t understand that a glowing, well written 5-star review can be the next best thing for your business after their purchase.
You need to overcome your fear of asking for a review.
There are a variety of ways to ask for online reviews. Review generation is the foundational strategy for proactive review management. If your product or service is mind blowing, customers will write reviews.
You’re probably already familiar with the impact online reviews can have on your business. What you may not be familiar with is how you go about structuring your review management campaigns.
Today I’m going to show you how to send out your review request campaigns using Grade.us.
Let’s dive in.
Table of Contents
What your email review request campaigns need
To get started you’ll need to have:
- Your configured Grade.us review funnel set up (that includes your targeted review sites).
- Your review request email templates.
- A list of customers that includes their first names and their email address.
We also offer review site deep dives, helpful guides that show you how to set up and optimize your review profiles on specific sites (e.g., Yelp, Google, TripAdvisor, etc.).
Depending on your industry, you’ll want your templates to include the name, title, and contact details of someone in your organization. Once you’ve gathered these materials, you should be ready to send out your review management campaigns.
Before I deep dive with the play by play of best practices, I’ve first put together a little screen share walkthrough video of the process for reference:
Use the time stamp to jump to the part of the video that you need:
00:27 Where to find review requests in Grade.us.
00:48 Filling out the initial email campaign details: from name, from email, reply email settings, first email delivery time.
3:16 Brief explanation of the In-Queue recipients status section.
3:42 Intro to the email drip campaign setting and template.
4:20 Adding or removing an email to your drip campaign.
4:39 Adjusting your mail settings.
4:55 Adjusting individual email settings send time and subject line.
5:40 Editing the body copy of the email.
6:30 Using placeholders to personalize your email campaigns.
7:47 Manually adding email recipients individually on the Grade.us platform.
8:36 Manually adding email recipients in bulk on the Grade.us platform.
9:10 Adjusting the auto-activation of recipients.
9:40 Using the client/employee facing form.
11:30 Opt-in form customization.
12:09 Import/export recipients.
12:14 Recipient performance tracking.
Okay, let’s take a step-by-step look at how you do that with Grade.us.
Setting up your email review requests
At this point, you’ve added your business to Grade.us.
You’ve set your location, added your review site listings, and designed your review funnel landing page. Let’s set up your email review request settings.
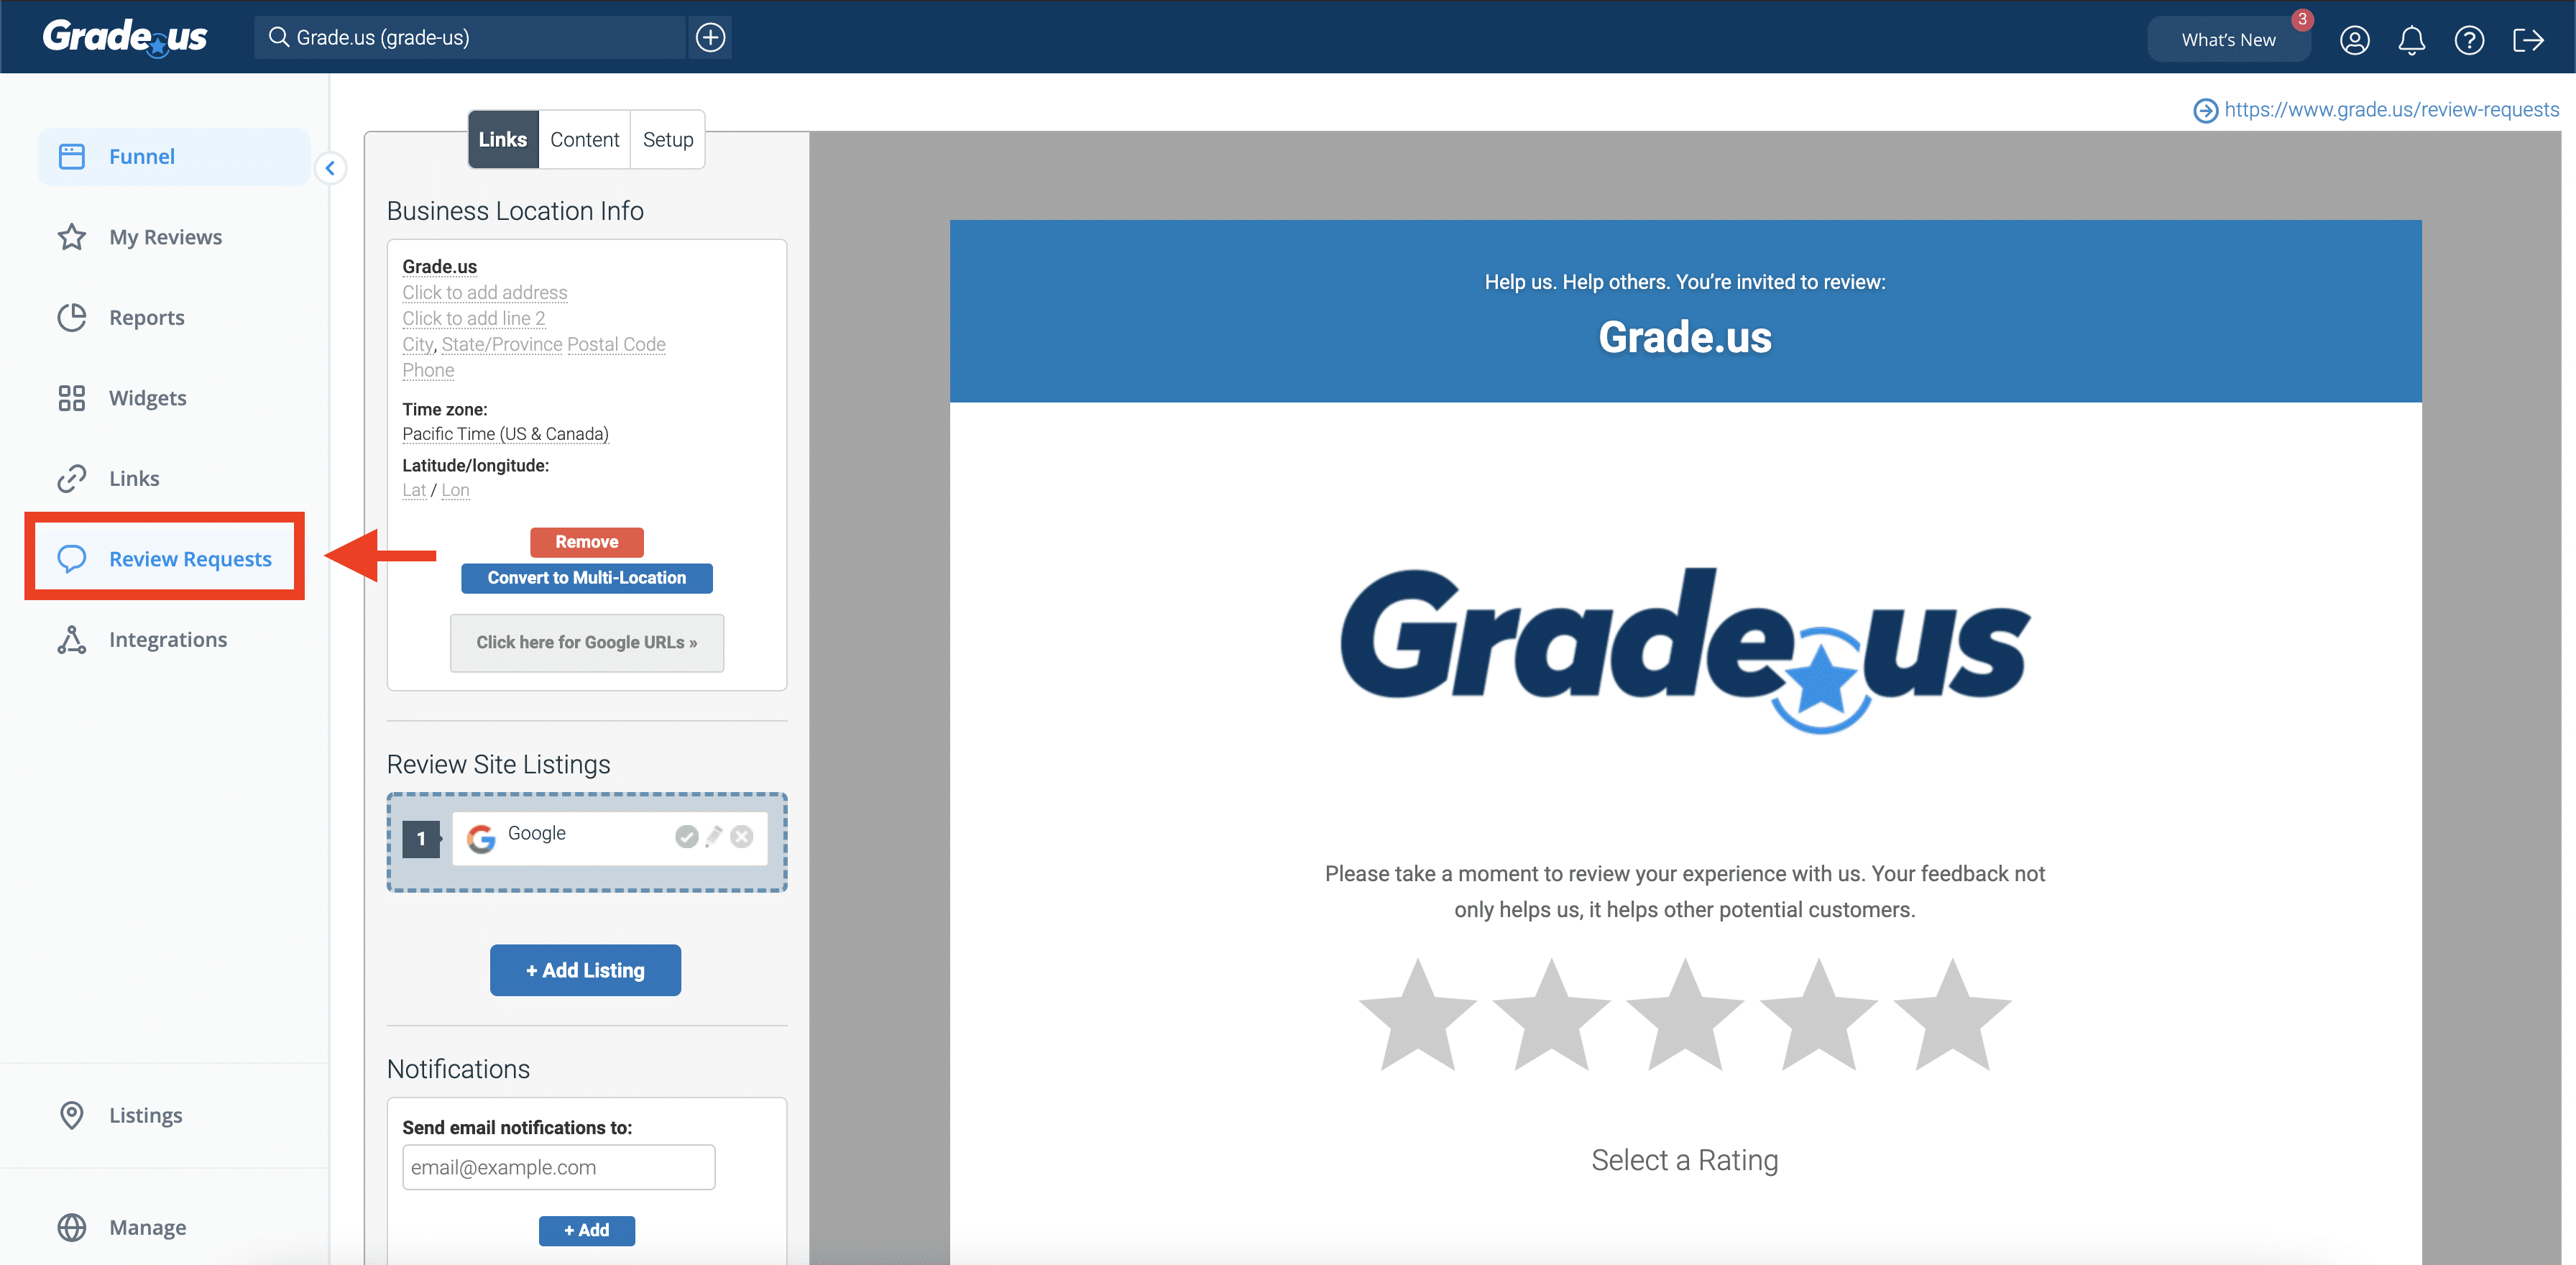
First, click Review Requests. Then in the sub-menu that appears, select Email Settings.
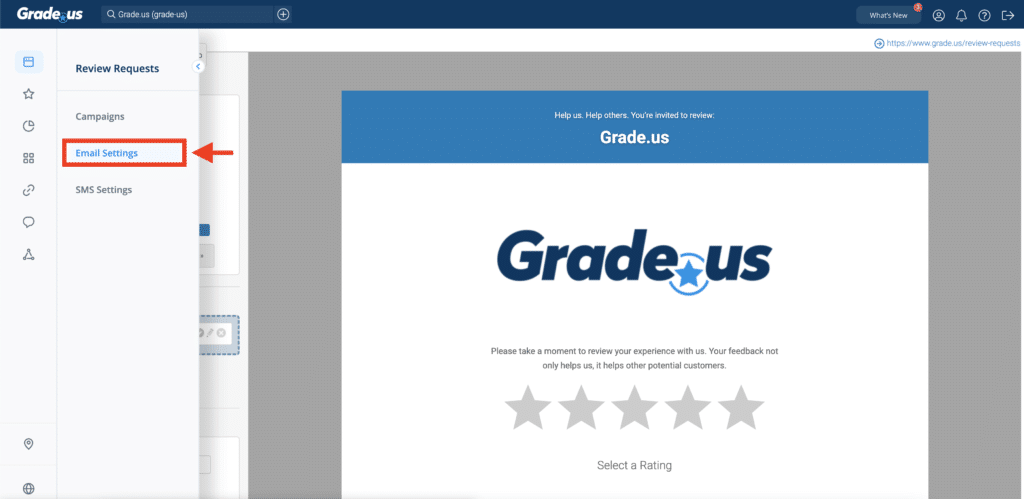
If you are setting this up for the first time, you should see the setup prompt.
We will now see 5 fields and settings we need to set up:
- From name
- From email
- Reply email
- Default timeframe to send first email
- Deactivate recipients on click
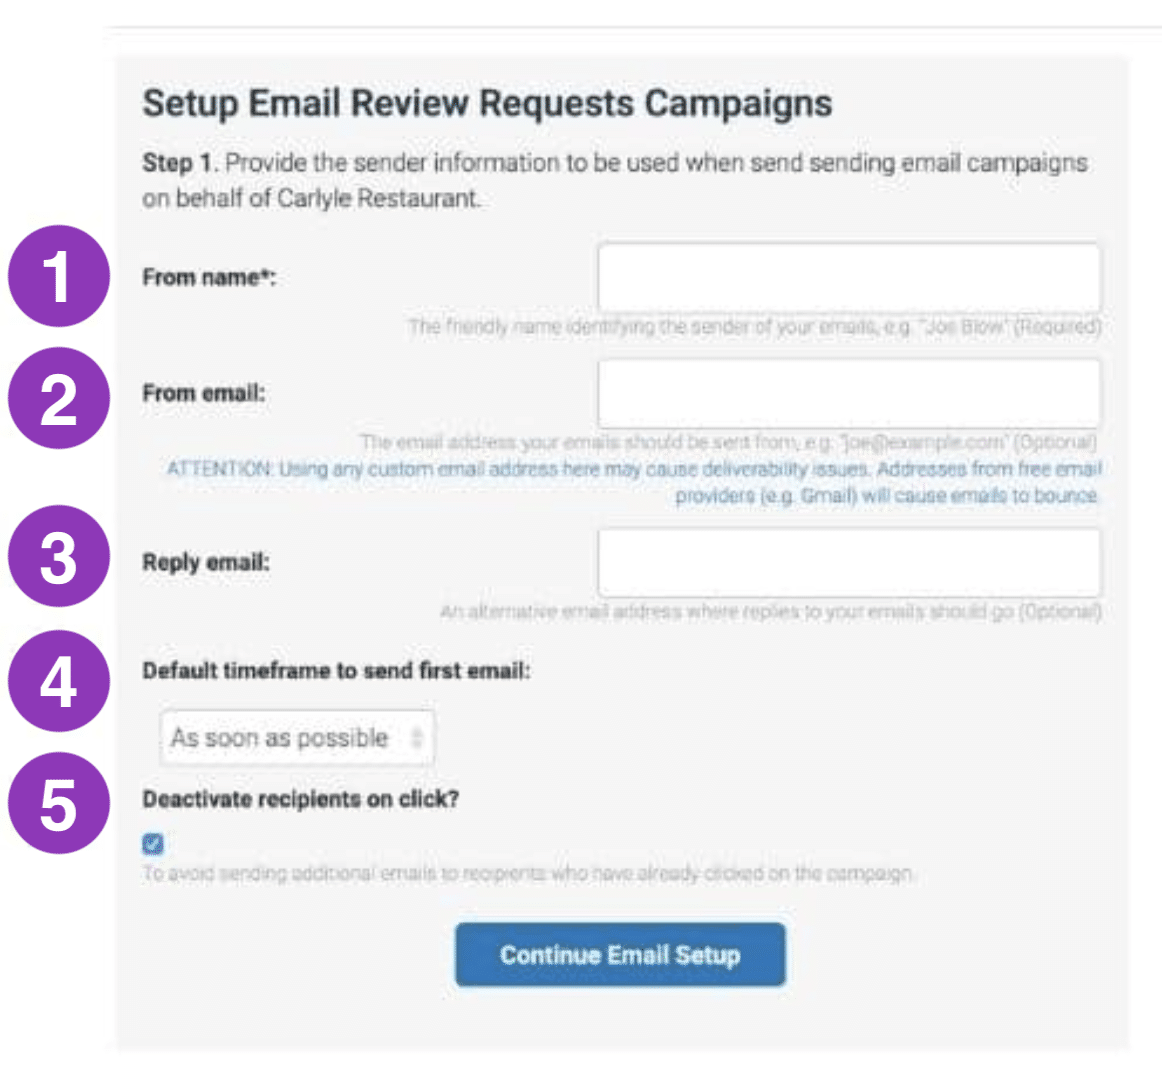
1. From name: When someone sees the name that appears in their email. You could either use the name of the owner, the name of the business, or an employee name along with the name of the business.
- Jennifer Tinsley (Business owner name)
- Carlyle Restaurant (Business name)
- Jesse from the Carlyle (Name and business)
2. From email: This is only going to be where the email comes from. Remember that you can set up a different email that replies go to. While you can set this up to come from a custom email, due to various email service providers, the deliverability of the email is subject to your email’s reputation and may bounce. If you don’t put anything in this field, your review request email will come from [email protected].
3. Reply email: It’s essential that you have reply emails forwarded to someone who is available to respond. It’s infrequent that you receive replies to an email like this, but it does happen and you don’t want to leave your customer hanging, especially when reviews are on their mind.
4. Default timeframe to send first email: For most businesses, having the email go out right when they’ve interacted with you makes a ton of sense. Don’t worry though, you can always adjust this setting after initial configuration.
5. Deactivate recipients on click: The idea here is whether your customers take the first action by clicking on the button in the email, do you want them to continue to receive additional emails in your campaign? The only tricky thing here is that they might click on the button, but not go all the way through the process and ultimately write the review. We have this option as the default though, because it straddles that line of assuming that funnel works without annoying a customer who has started the process.
With your default setting configured, you can now go into crafting your email campaigns.
Putting together your review request campaign:
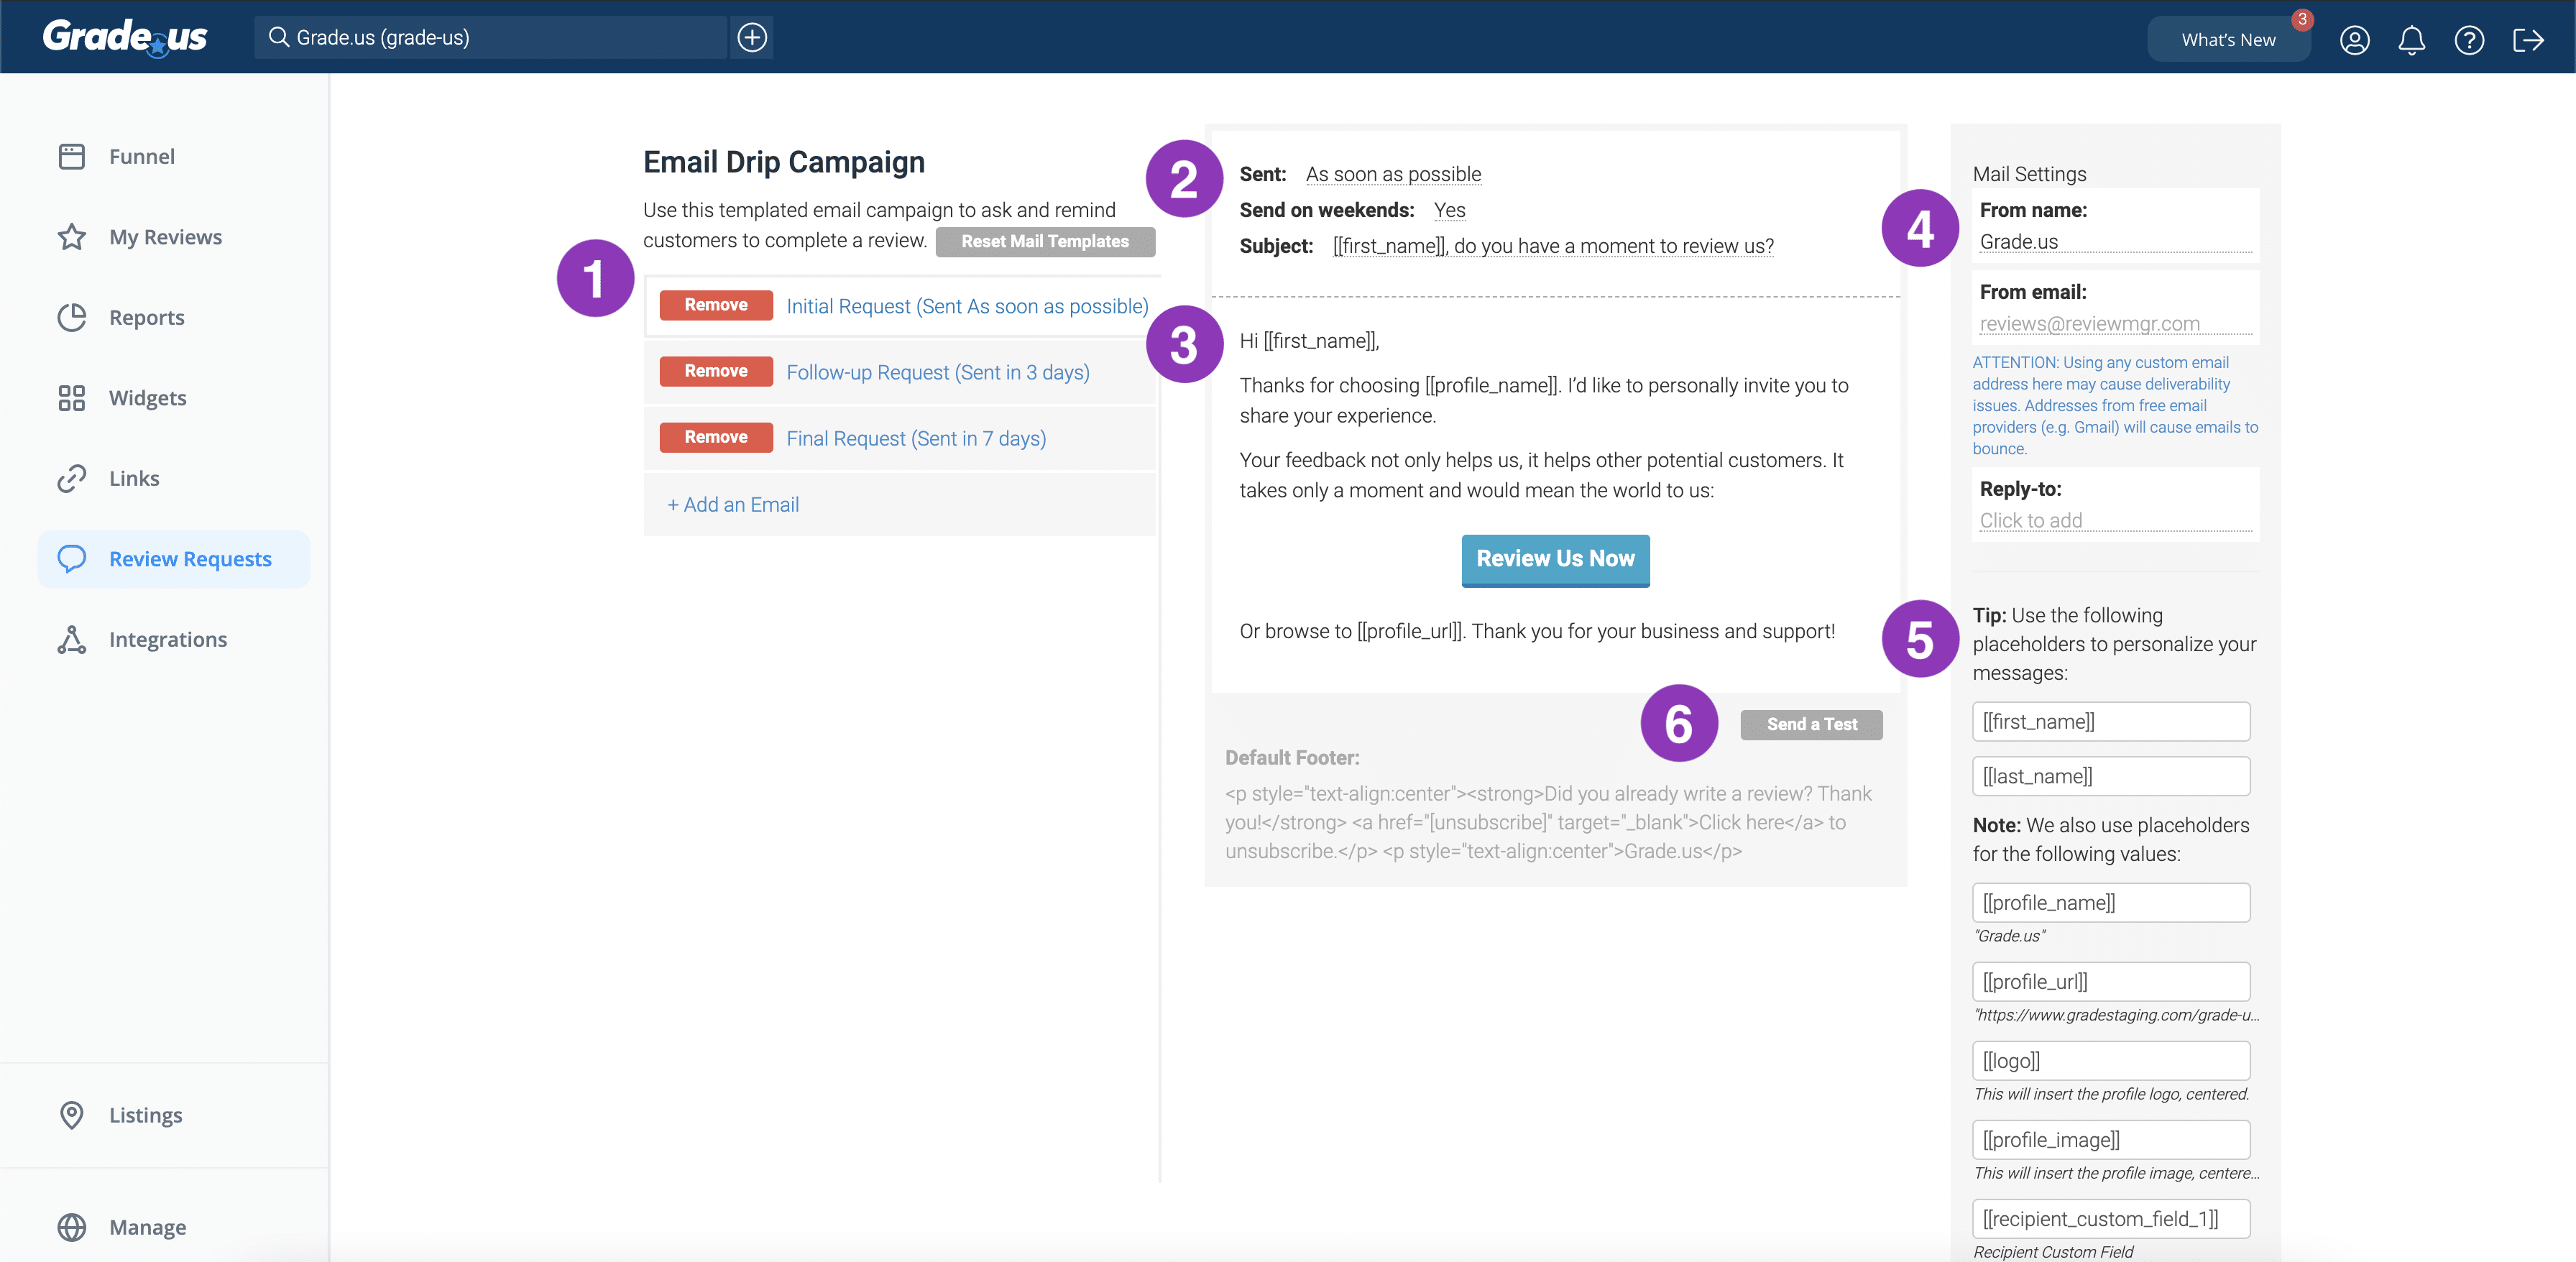
1. Choose how many emails you want in the campaign drip.
When it comes to email drip campaigns, we’ve found that 3 emails over the first week is most successful among grade.us customers. We’ll talk a bit more about cadence options when optimizing your campaigns.
2. Choose when you want the emails to be sent, whether to send it on the weekend, and what your subject line should be.
You will need to decide when each individual email is sent out, so ensure that you set the ‘sent’ date for the initial, follow up and final emails in the campaign.
Sending on the weekend depends on your business. If you typically work in B2B, during the work week makes the most sense. If you’re B2C, it doesn’t hurt to have the send on weekends turned on.
The subject line is the most important part of your email. We’ve put together a ton of subject lines that you can try.
3. Writing the body of the review request email.
Our default templates are tried and true. They are effective, simple, but general enough that everyone can use them. It’s worth taking the time to adapt the email for your business. If you are a doctor, you may want to refer to your patients. If you’re a lawyer, you may want to use clients. There are a variety of nuances to your industry that will work for you. We’ve addressed more of those nuances around tone and voice below, but here are some of the other email template options that we have put together:
One essential element to remember: always include the link/button to your Grade.us review funnel.
4. Update your sender and reply info.
These details were already addressed in the set up section, but here’s where you can adjust them whenever you need to.
5. Personalize your emails.
So we offer some pretty nifty little personalization tokens that allow you to customize each email with the first name of your customers. You can also use the placeholders to add your logo, business name, review funnel link, and more. Placeholder personalizations can be used in the subject line and the body of the email.
Pro tip: You can even use the custom field tag to set up your own personalization (like mentioning the employee that helped the customer) via the review request form.
6. Test test test!
Once you have all of your email templates set, make sure that you test them out yourself and get feedback from some friends or colleagues to see if they resonate.
Optimizing your email review requests
An email review request campaign has a primary goal. Let’s get a great review on one of the review sites important to us. That’s the main metric that we’re tracking and what will indicate success. Beyond reviews though, you want to make sure that your emails get opened, read, and your call to action ‘Review Us Now’ gets clicked. If your customers never get to the review funnel, the email campaign will be unsuccessful.
When it comes to designing a great email campaign, there are a variety of factors to consider and best practices to understand when it comes to email marketing.
Let’s take a look at what you should be considering when crafting a post-sale email campaign:
- Message: value, purpose, length, and clarity
- Style: personality branding, tone, and voice
- Cadence: campaign timing, frequency, urgency and deliverability
- Analysis: measuring performance, optimization, and testing
Your messaging needs to have a clear purpose, specific directions to achieve that purpose, an appropriate length, and value.
For acquiring online reviews, the email doesn’t need to be complicated or difficult to write, but you need to consider these aspects so you’re not shooting yourself in the foot.
Message value, purpose, length, and clarity
In this case, the purpose is clear.
You want your customers to open the email, read the message, and move directly on to completing a positive online review for your company. This is not the time to highlight your social media channels, recent blog posts, or newest promotions.
The point of this email is to get a review. That’s it.
Before crafting your emails, think about exactly what you want the customer to review.
- Would you like them to explain what they like about the service?
- Should they name the person that helped them?
- Would you like them to mention something about the actual location?
Guided Prompt
Your customers aren’t psychic. They don’t know what you expect from them if you don’t communicate. Don’t over think it. They can follow simple directions if you provide them.
As mentioned above, you now know exactly what you’d like your most recent customer to focus on when writing their review.
When you sit down to write the email, provide some specific prompts to include in the body.
If you do want them to name the person that helped them, try including a line explicitly saying:
“How was your experience with the person who helped you? Let us know who it was so we can let them know!”
Requesting specific details will add more value to the review.
When sending a customer to a 3rd party review site via email, remember that they’re leaving your sphere of influence. One of the benefits of the Grade.us review funnel is that there are specific instructions on how to use each specific review site. It adds a step in the funnel, but also clarifies exactly what needs to be done.
Email Length
I know that I personally struggle sometimes with limiting my word count. There’s so much I want to convey! But if your email is too long, the recipient will never get to your call to action.
Try to keep your email concise. It’s important to let your personality shine through, but do it in a way that’s not a distraction from the goal of the email.
Personality Style, Branding, and Voice
Different professions have different codes of conduct, of course. Some industries and professions are necessarily more conservative like lawyers, doctors, and B2B services, while others differentiate themselves with more of a bombastic approach like nightclubs, fashion retail, and entertainment.
Even if you’re in a more conservative profession, find ways to be human in your tone.
You know your audience better than anyone else, and you’ve worked hard to solidify your brand’s identity and personality. A conversational approach to emails is more endearing than a standard generic template. Speaking to the recipient by using “you” instantly boosts that connection.
Tips for adding some personality in your review request emails:
- Create a “thank you” video.
- It doesn’t have to be long, in fact keeping it under a minute is ideal. Pick someone from your company that comes across well on video and epitomizes your company culture.
- Tell a short mini story.
- Did a review recently help another customer? In 2-3 sentences, share how that previous customer’s review helped other people decide that your company was the right fit for them.
- Share a tip for the next time they want to use your company.
- Include a short ‘pro-tip’ for them to have an even better experience next time. Do you have a special trivia night on Thursdays? How early in advance should they schedule their next appointment?
- Remember that even though you’re providing a tip, this isn’t the time to include a link that diverts from the call to action.
Campaign Cadence
Wouldn’t it be great if you could ask for something once and receive it? The reality is that sometimes you have to ask and remind and remind again.
One nice thing about making the ask for a review in an automated email “drip” campaign is that it’s, well, automated.
We’ve found that 3 emails over the course of one week provides a nice, gentle reminder prompt that isn’t overbearing. Too many emails in a short amount of time will annoy your customer. But people are busy and forgetful, so you don’t want to send just one email and be done with it–our users see review conversions on emails #1, #2 and #3, so we know that reminders work.
You’ll want the first review request email to go out while the experience is fresh in the customer’s mind, especially if you’re hoping for them to include specific details in their review.
That said, you may want to increase the urgency of the message with each email to get the job done.
- Second email: Highlight review importance and value their time – In the second email, acknowledge that you’re following up on the first. Highlight the importance of the review while the experience is fresh in their minds, and show that you do value their time
- Final email: Use time sensitive language – While you don’t want to make a customer think that they’re run out of time to submit a review, you can use some time sensitive language that urges action. You can even make it humorous, “I know my memory fades more quickly as I get older. We’d love for you to share your experience before your memory fades too!”
If your relationship with your customers is ongoing, like a doctor or lawyer, you might want to set up a long tail campaign that starts with the 3 emails in a week, but then occurs on a monthly basis until you secure that review. The longer the relationship with the customer, the better review you’ll receive, so don’t let those long time customers slip through the cracks.
Analysis, measuring performance, optimization, and testing
Once you have your review funnel set up, you can begin to see how successfully your email campaigns convert.
While you can begin to analyze after a couple of weeks, I’d recommend allowing a month to pass to secure your review conversion benchmarks.
Having your conversion metric baseline allows you to begin testing what’s working and what can be improved.
When it comes to A/B testing your email campaign, you need to approach your experiments like a scientist. In order to know how your changes are impacting your conversions, you’re going to want to make one change at a time.
It’s tempting to completely rewrite your email and see if that works, but there are so many variables when you make multiple changes that it can be difficult to identify which part of the change increased or decreased your conversion rate.
Here’s a list of components to test over the course of a year:
- Subject Line
- Greeting
- Main value sentence
- Call to action (Button vs link, Button color, messaging)
- Any other components of the email (graphics, video, designed html email vs text email, photo of person who sent the email)
First, you’ll want to craft a spreadsheet to track the changes and conversion rates. Depending on the quantity of potential users that enter your review funnel (look for at least 10 per week), set up a 1 to 2 week window of testing. After the time frame is complete, you can compare the conversion rates. If it worked, keep the new copy and try to change something else for the next window. If the conversions decreased, return to the original copy and restart the process of A/B testing.
Sending out your email review request campaigns
Now that your review requests are all set, it’s time to start sending them out to your customers.
There are actually a variety of ways that you can schedule campaigns to go out.
- Manually in app (individually or in bulk)
- Manually via the employee review request form (individually or in bulk)
- Manually via the customer-facing opt-in form
- Automatically via our Salesforce and Mailchimp integrations
- Automatically via our Zapier integrations
- Automatically via the Grade.us API
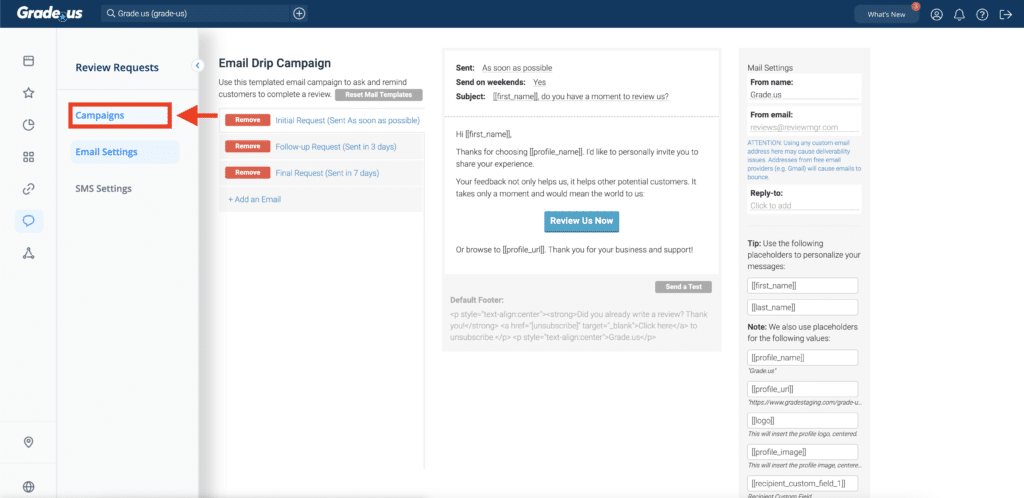
Manually in app (individually or in bulk)
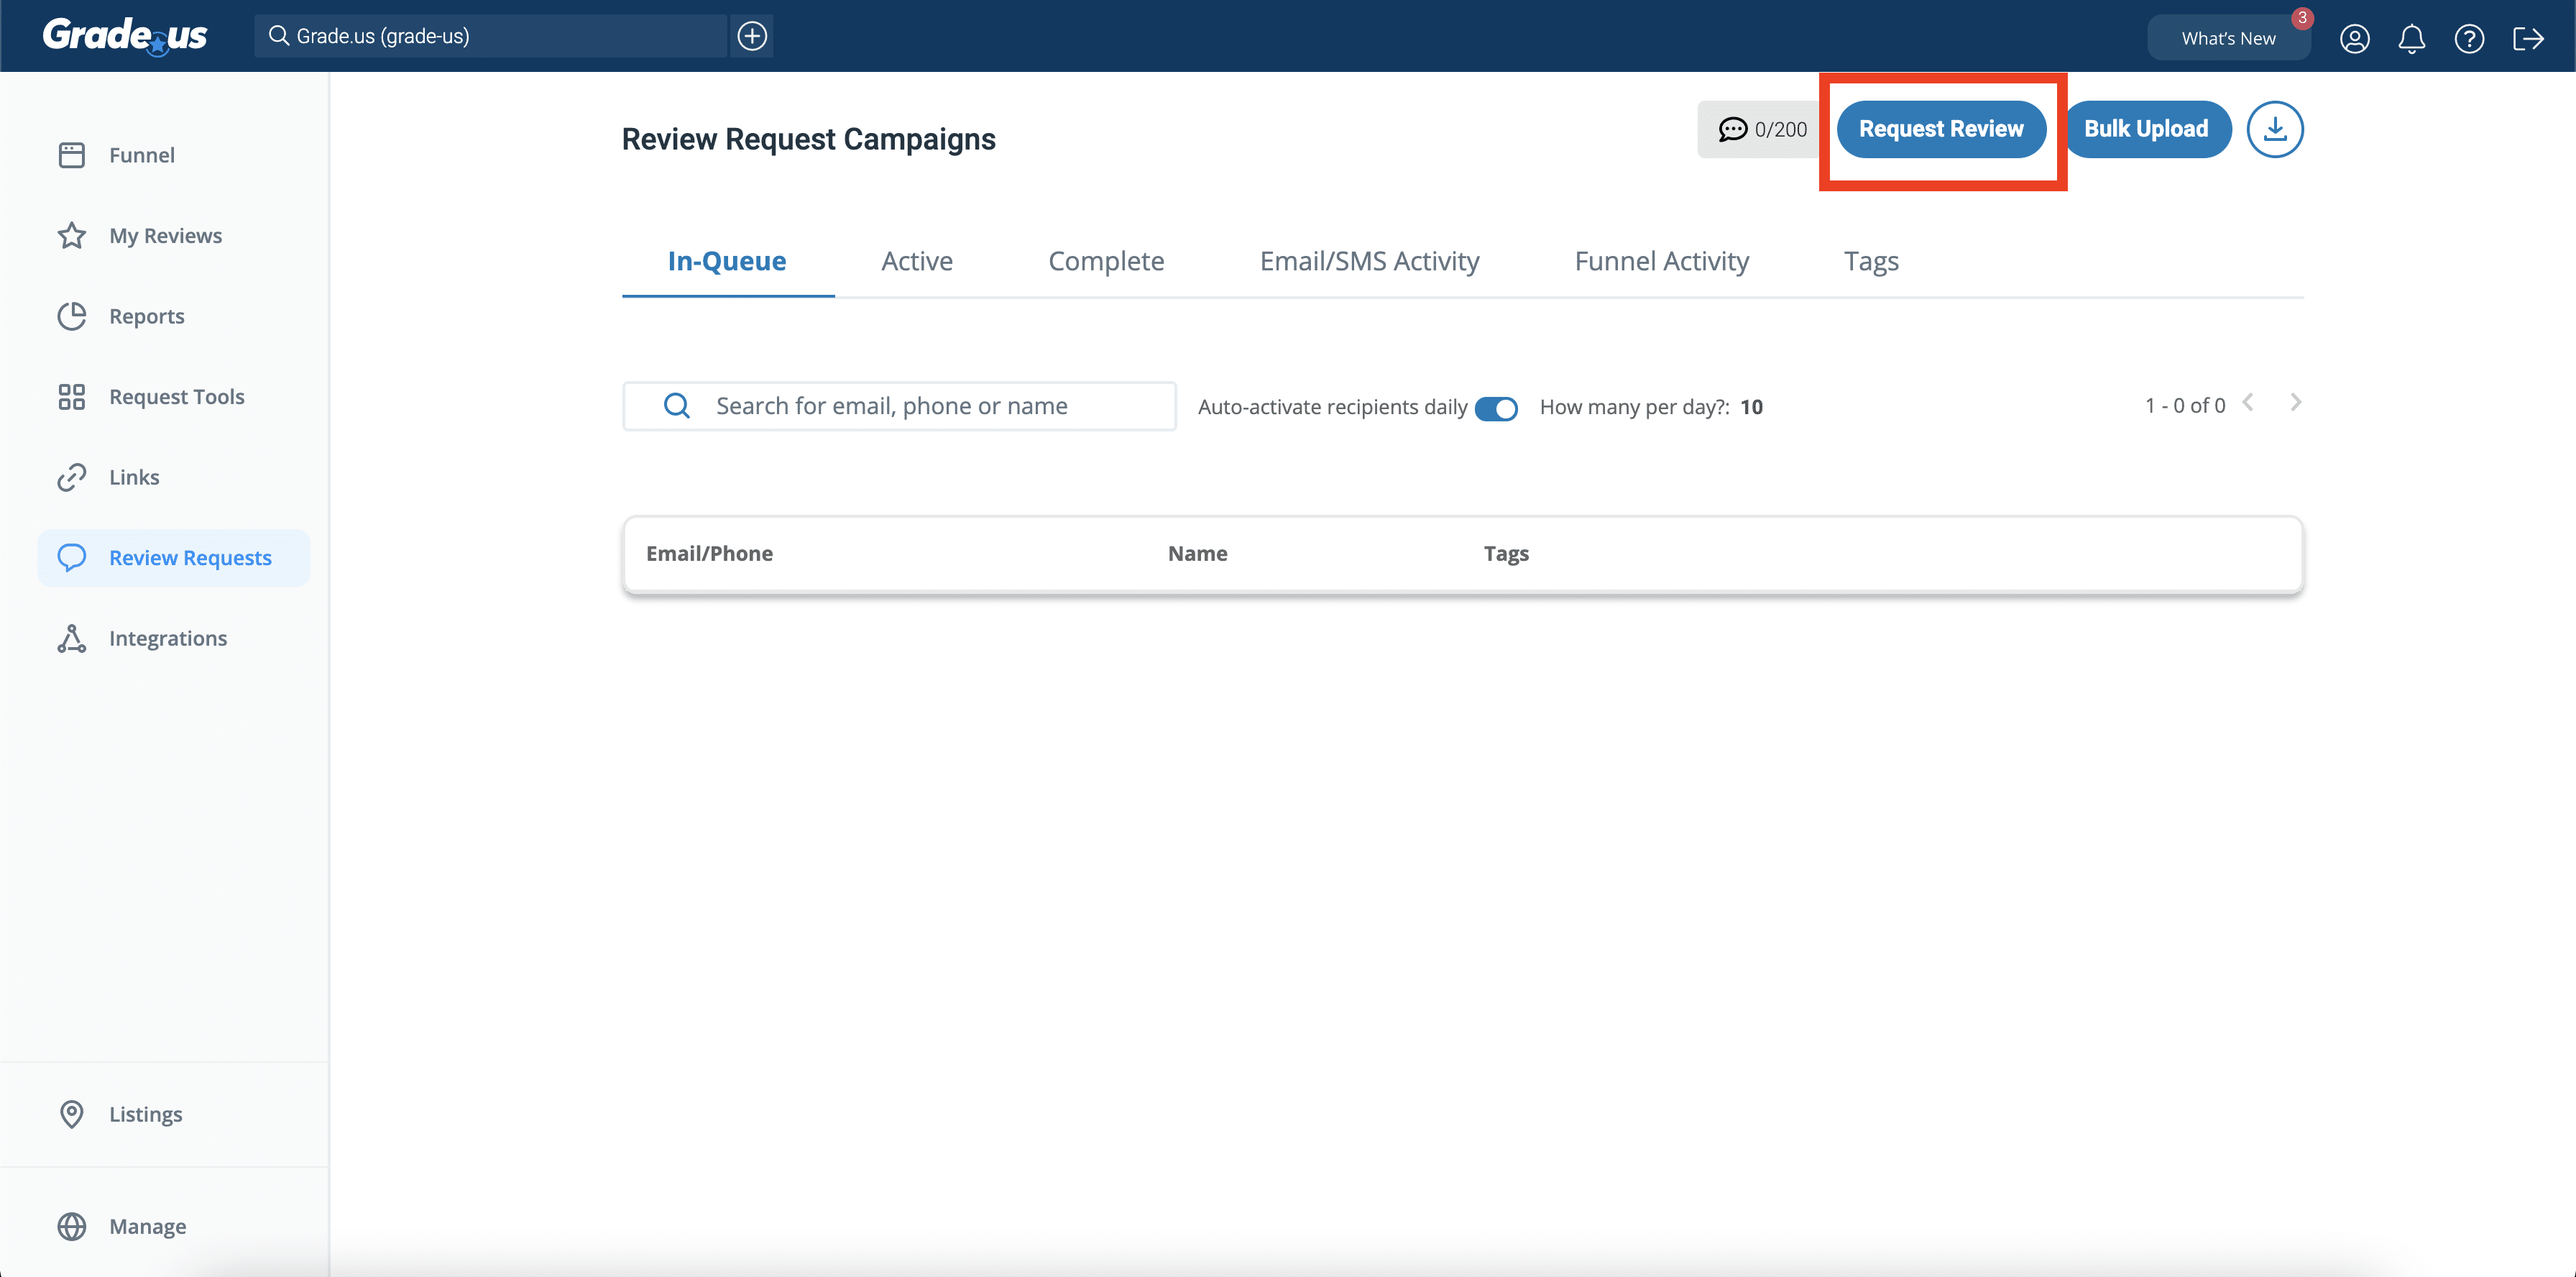
The most common way we see Grade.us customers submitting their customers for an email review request campaign is simply by navigating to Campaigns from the Review Requests sub-menu.
Individual recipient
To send out an individual email review request campaign, click the blue “Add a Recipient” button.
You’ll get a simple modal window where you can fill in the details.
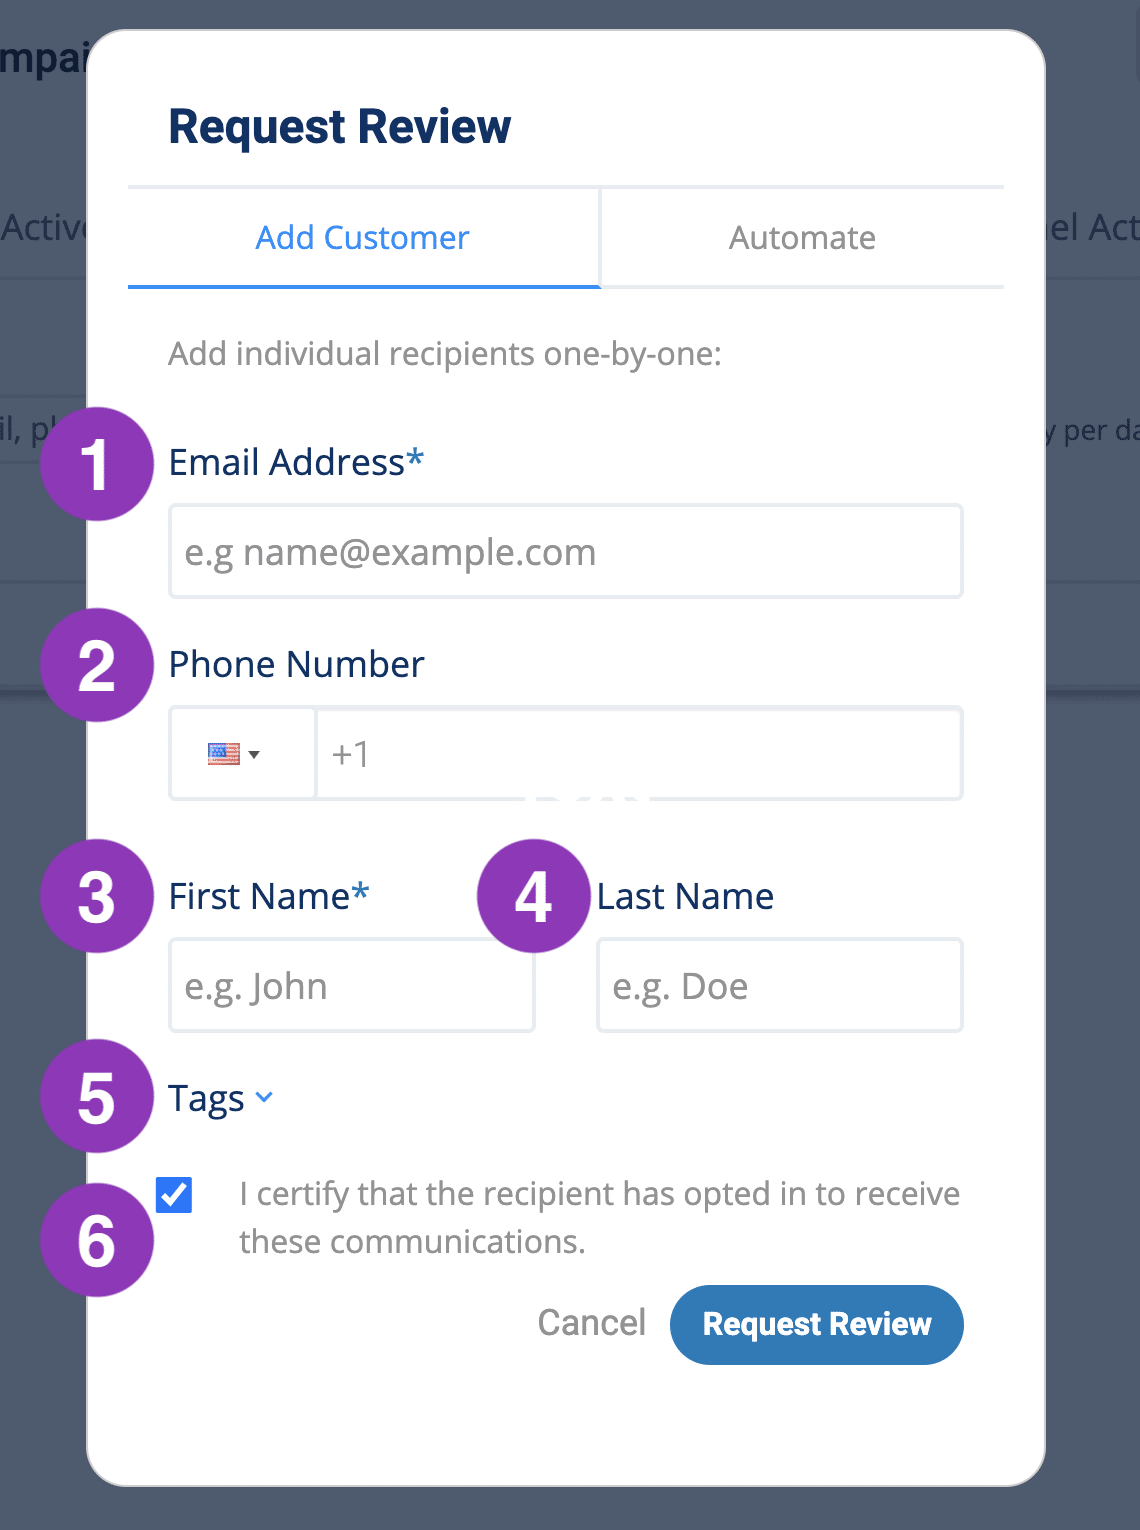
The form is pretty straight forward:
- Email Address. Required for every recipient, enter the email address to which you would like to send your review requests email communications.
- Phone. If you would like to also enroll this individual in your review requests SMS communications, enter their mobile phone number here.
- First name. Whatever you fill in here will be used in the email template [[first_name]] placeholder
- Last name. As you can guess, [[last_name]] placeholder.
- Tags. Tags can be useful if you’re using Grade.us for when you might have two or more different types of reviews that are still funneled to the same place, like an auto dealer that has both sales and service reviews. Use the tags to make them easily searchable in your campaign reporting.
- Certified Opt-in. With every recipient added to our system that you’ll be enrolling in email and/or SMS campaigns, we ask that you certify and confirm that the recipient has opted in to receive communications from your firm.
Bulk recipient upload
To upload in bulk, click the “Upload CSV/XSLX” button.
You’ll see a simple modal window where you can upload the file.
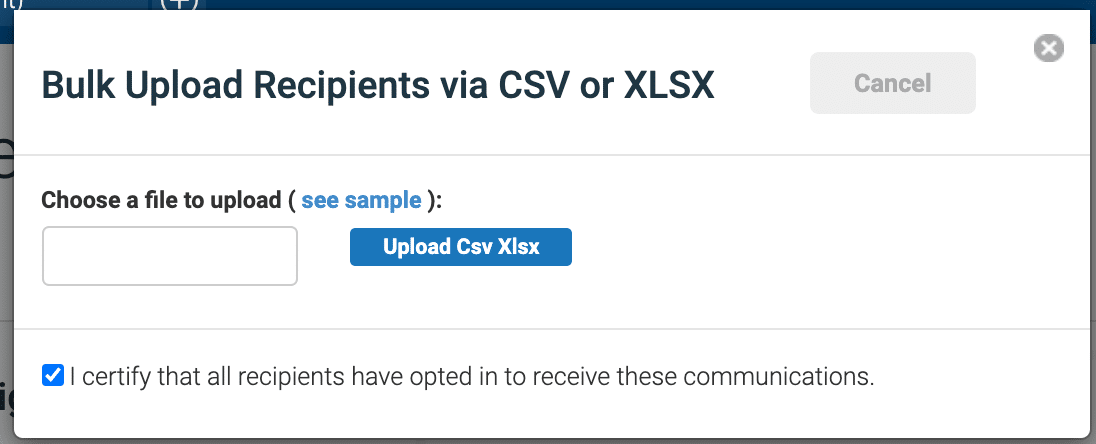
To avoid any errors, ensure that you have the file formatted correctly. You can use the sample csv to format your list.
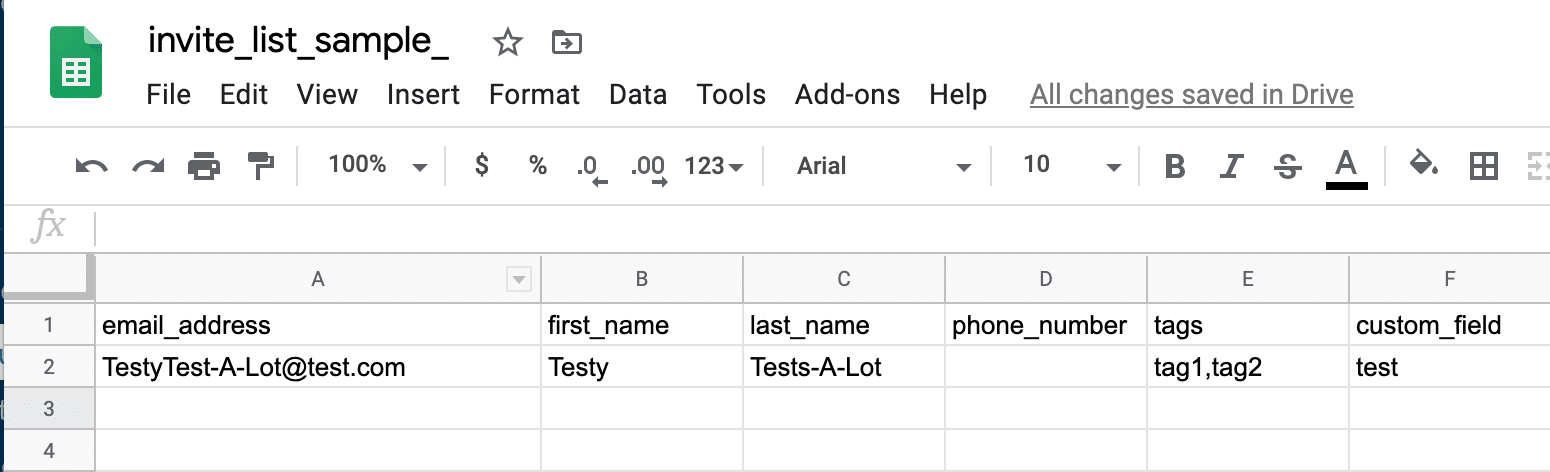
Notice that you can add your own custom_field to the top row label so that’s included in your bulk upload as well.
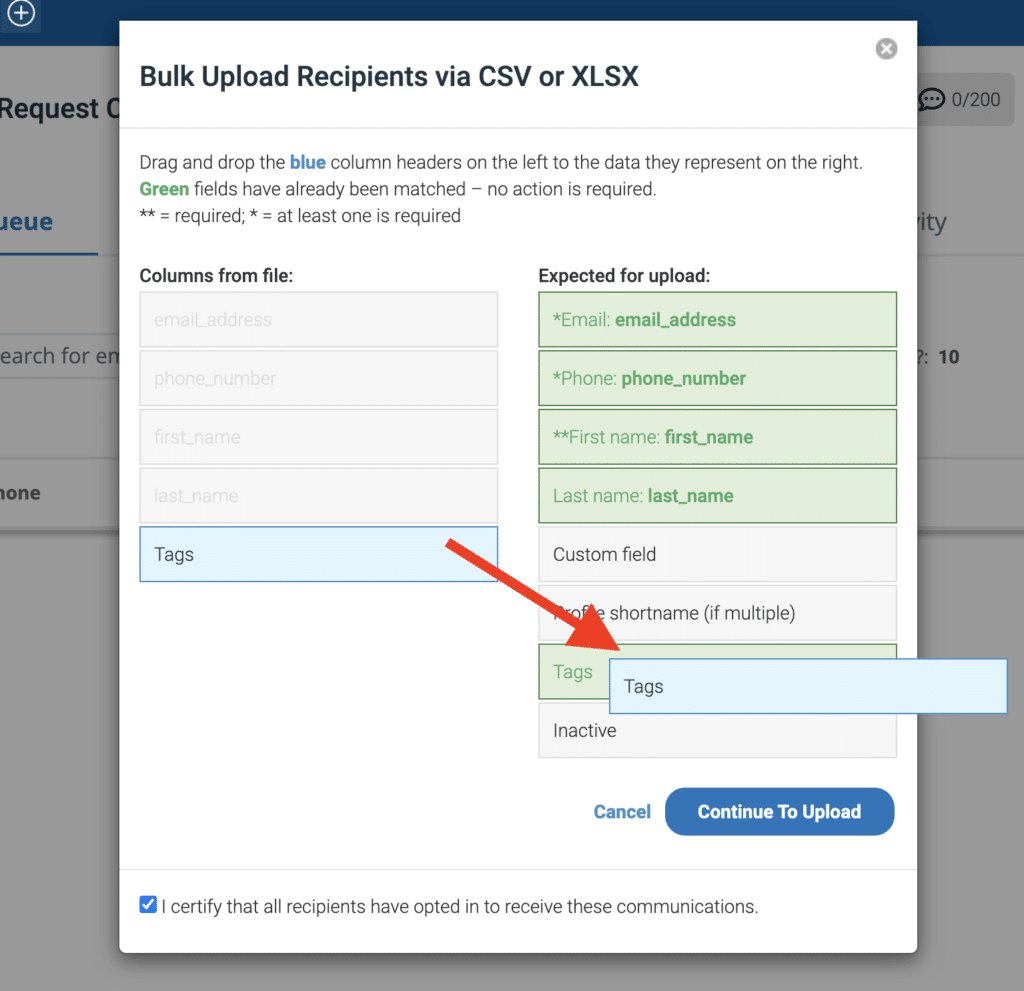
When you upload the CSV file, you will be asked to match up your custom field ‘Column from file’ to the ‘Expected for upload’ section.
You’ll do this by simply dragging and dropping the blue block(s) from the Columns from file list (found on the left) to the corresponding grey block found under the Expected for upload list (found on the right). If successful, the blue block in the left-hand list should turn grey and the grey block in the right-hand list should turn green.
Manually via the employee review request form (individually or in bulk)
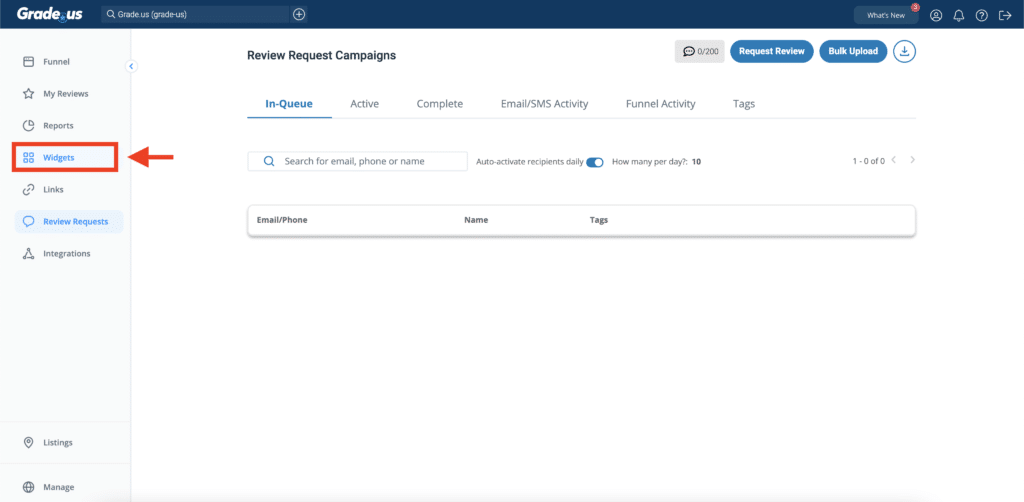
You can find the client/staff review request form by clicking Widgets in the main menu.
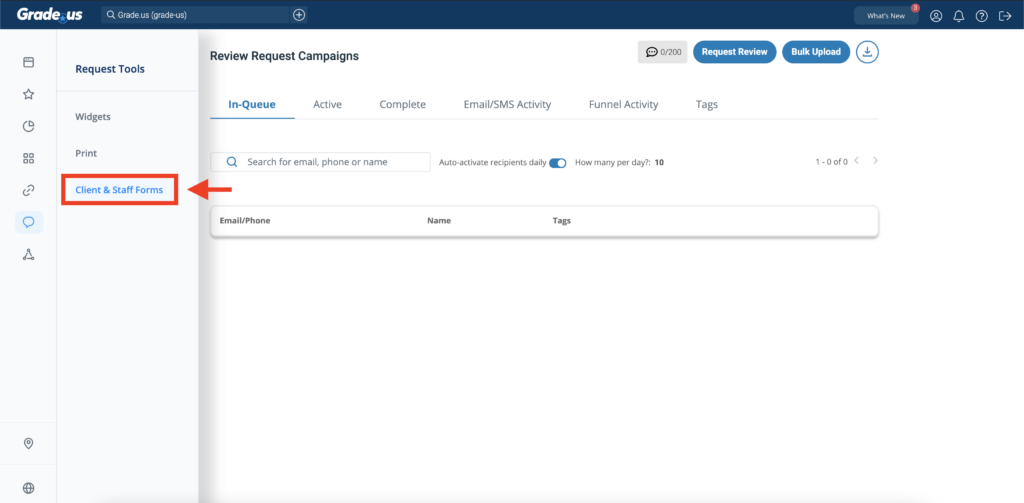
Then, in the sub-menu that appears, selecting >Client & Staff Forms.
The cool thing about this mode of customer uploading is that the forms can live on a browse via a custom URL.
So if you have clients, you can have them upload their customers individually or in bulk themselves and provide them with the link that they can keep open in their office or place of business.
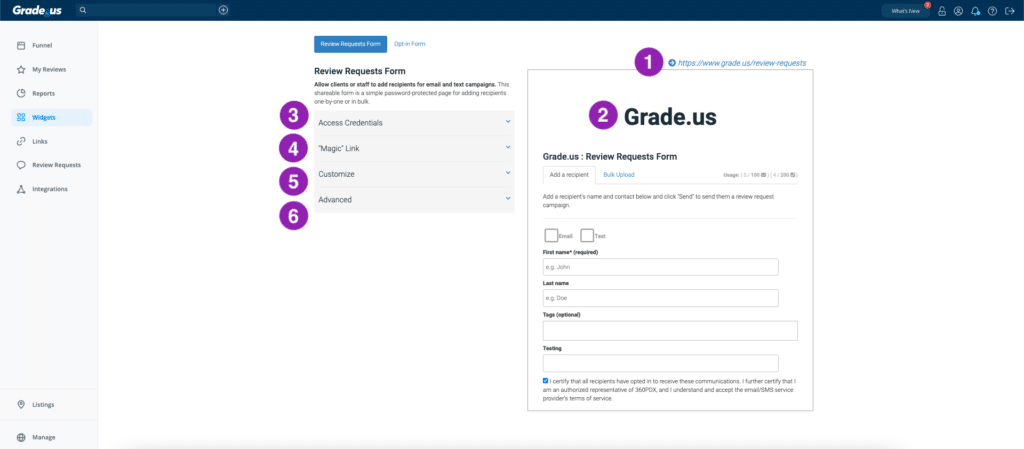
1. Client form URL. This is the URL you can provide to clients or your staff that they can bookmark on their browser for easy upload of customers info to send out review request campaigns.
2. Brand logo. For our agency and business customers that white label Grade.us, your logo (that you upload under your brand profile) will appear on the form here.
3. Access credentials. The client/staff facing form is password protected. You’ll want to provide your client or employee with the username and password here.
4. “Magic” Link. Don’t want to password protect your form? Just send over this magic link that bypasses the password protection.
5. Customization. One of the best aspects of Grade.us is the ability to customize everything. That’s why marketing agencies gravitate to our tool. Here you can set up the form for your clients with as simple or clear instructions as you need.
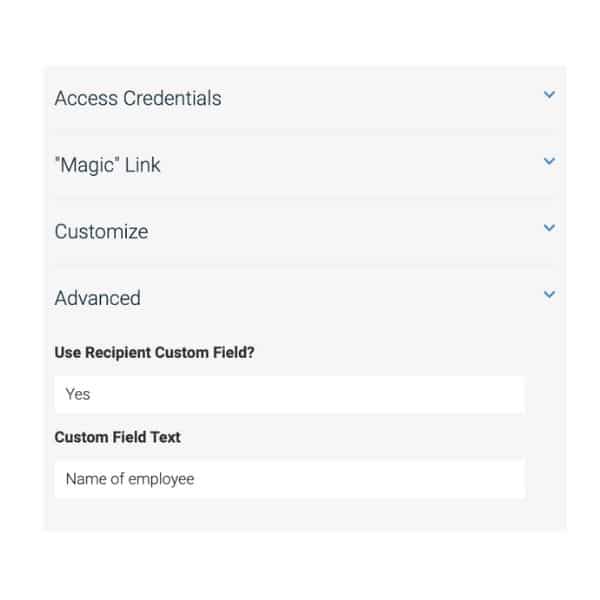
6. Advanced. Wondering where you can add the custom field in this form? It’s hiding in the advanced section. When you add your custom field label, it will be added to the form.
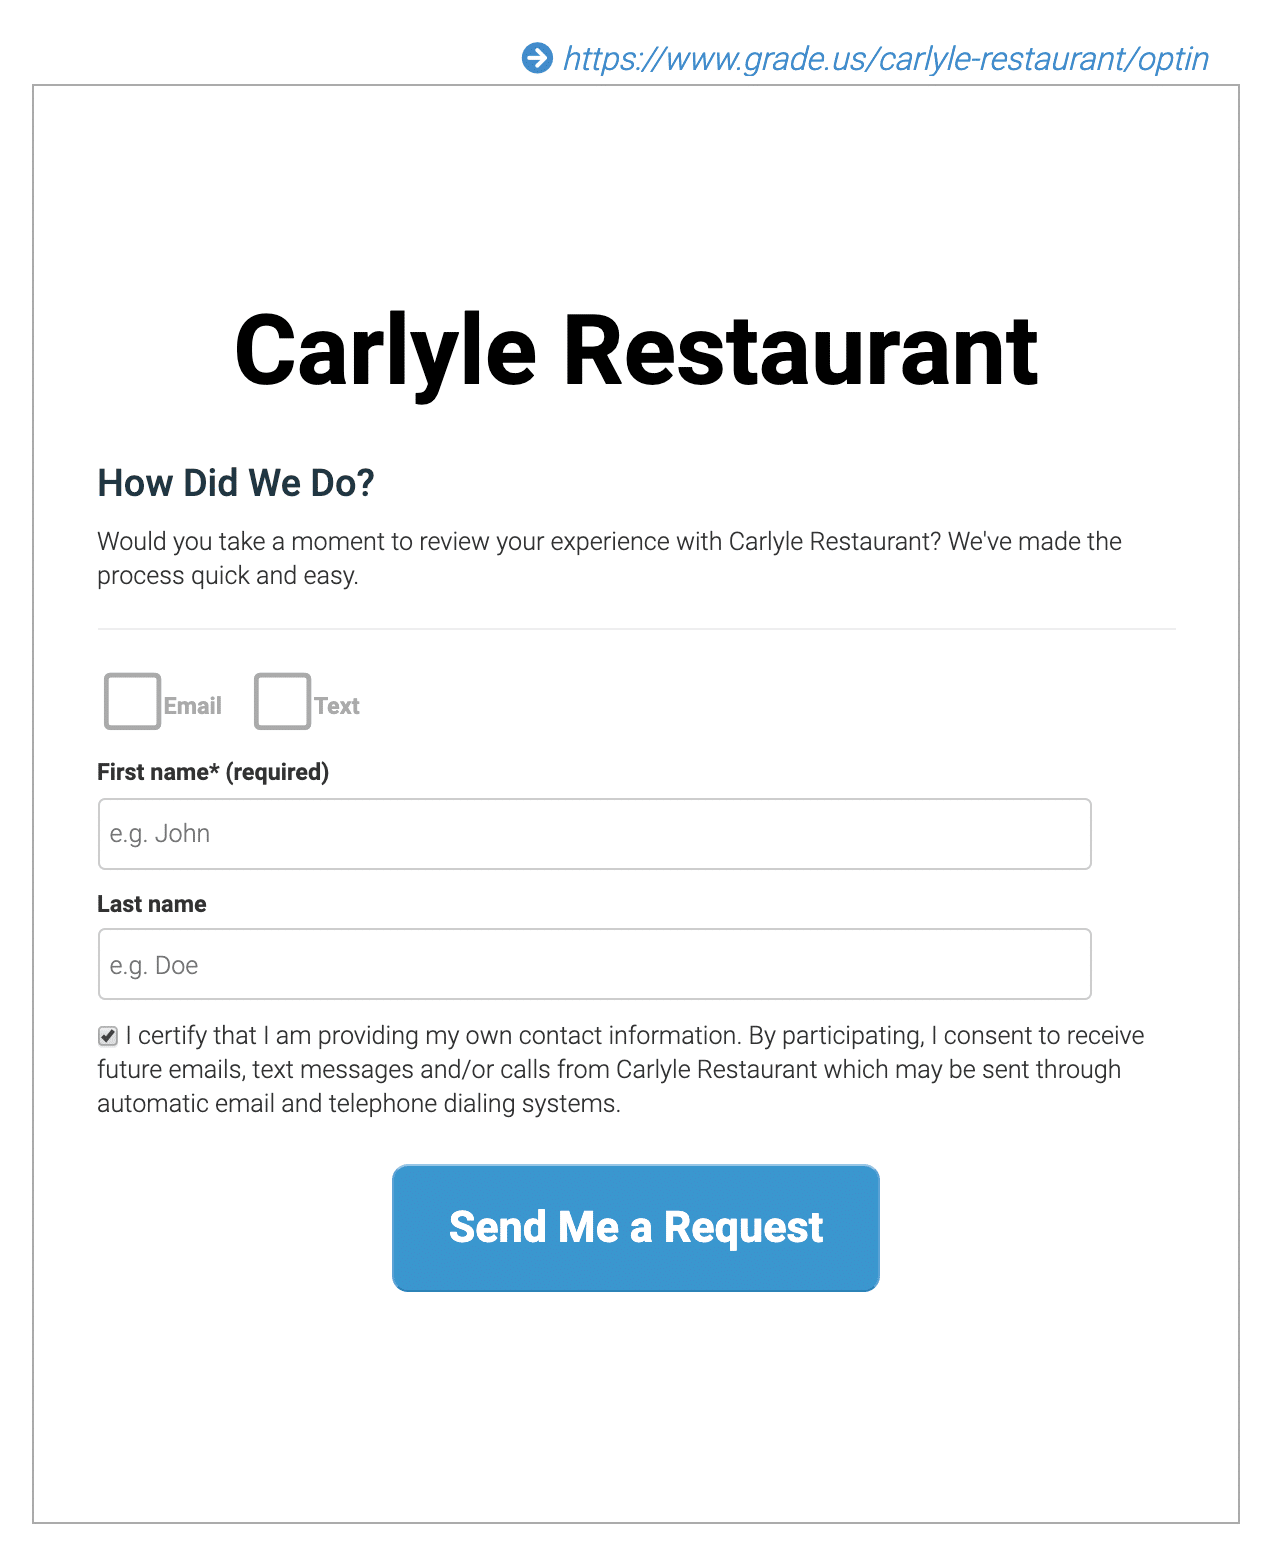
Manually via the customer-facing opt-in form
The customer facing opt-in form is ideal for in store/office visits.
If you have reopened your business, you can have the little form set up on a tablet where customers can put in their email address and opt into your email campaign.
The logo that you upload for this profile will also appear here. So if you’re an agency or a reseller, you can ensure your client’s logo shows up here.
Pro tip: Keep disinfectant wipes or hand sanitizer next to the tablet for safety measures.
Automatically via our Mailchimp and Salesforce integrations
Native integrations can save you a significant amount of time and money.
They are especially valuable for agencies. According to ProfitWell, clients that are set up with integrations are willing to pay 8-13% more for core services. They also are 10% less likely to churn.
You can set up your integration by going to Dashboard > Integrations.
Choose your app and connect your account. We currently natively connect to Mailchimp and Salesforce.
Check out all of our available and coming soon integrations.
Want to see how easy it is to set up? Watch the video below:
Automatically via our Zapier integrations
For users that want to automate the process of reviews requests using an app that’s not natively integrated, Grade.us offers a Zapier integration.
Zapier allows two different apps to ‘talk’ to each other. It’s easy for non-developers to create a recipe (a Zap) that requires zero code.
So for our Zapier connection, you can have a review request go out to customers when triggered by another app.
Use a CRM like Hubspot? Send out a review request when new customer is added to your account.
Have a POS that’s on Zapier? Automate the review request email campaign when the customer makes a purchase.
Use Quickbooks? Send out the email after a transaction.
Our Zapier is still in beta, but you can access the integration here.
Want to learn more about our Zapier connection? Check out this section of our Office Hours:
Automatically via the Grade.us API
The last way to send out review request email campaigns is via the Grade.us API. For API use, you need to be on the Agency Plan or higher. You also do need to have your own web developer resources.
Using the API, you can code a connection to other apps (like Zapier, but with the coding). Our API capabilities are pretty comprehensive. Check out everything our API can do in this office hours from earlier this year:
Sending out your review request email campaigns with Grade.us
Are review request email campaigns a game-changer? Probably.
Grade.us offers a ton of ways to request reviews. That’s what we do. The key about review generation is asking. That can be a face to face ask or over the phone. It can be via in store signage or text messages. Automation is appealing because it’s hard to consistently remember to ask your customer for reviews. When you automate the process, you are able to set up those little reminders that make earning the review more likely.
Nobody would argue the value of reviews. They help you build visibility online. As social proof, they help you market your business. Most importantly, they’re a channel to communicate with your customers. When you care about your customers, listen deeply to their concerns and celebrations, your business is much more likely to succeed.